ASA1;
failover lan unit primary
failover lan enable
failover lan interface FAILOVER GigabitEthernet0/2
failover link FAILOVER GigabitEthernet0/2failover interface ip FAILOVER 192.168.0.121 255.255.255.252 standby 192.168.0.122
failover
ASA2;
failover lan unit secondary
failover lan enable
failover lan interface FAILOVER GigabitEthernet0/2
failover link FAILOVER GigabitEthernet0/2failover interface ip FAILOVER 192.168.0.121 255.255.255.252 standby 192.168.0.122
failover
-----
Asa firewall un çalışma mantığı security level'lerdir. Eğer bizim paketimizin çıkış yaptığı interface'in security level'i gitmek istediği ineterface'den büyük ise hiçbir sıkıntı yoktur ancak eşit veya küçük ise işte o zaman access listler ve grouplar devreye giriyor. Global access liste herşeye izinlidir access list yada access group'a bakmaz.
Global permit (herseye izin verme konfigurasyonu)
same-security-traffic permit inter-interface
same-security-traffic permit intra-interface
access-list global_access extended permit ip any any
access-group global_access global
Ayrıca yazacagımız access listelerin sırası da onemlidir en son yazılan access listen once yazılmıs bir access list var ise ilk yazılan access list önemlidir.
access-list global_access extended permit ip any any
access-group global_access global
altta sadece 225.1.1.1 ve 226.1.1.1 izinlidir. usten altta göre öncelik sırası en son yazılan en onemsiz .
access-list test extended permit udp any host 225.1.1.1
access-list test extended permit udp any host 226.1.1.1
access-list test extended deny udp any any
access-group test in interface WAN
----
altta yazılan konfigürasyonun hiçbir önemi yoktur butun paketler gececektir :)
access-list ping extended permit ip any any
access-list ping extended deny ip host 192.168.3.100 host 192.168.2.100
access-group ping in interface LAN
doğru yazımı bu şeklildedir , permit any any yazılmasına gerek yoktur .
access-list ping extended deny ip host 192.168.3.100 host 192.168.2.100
access-list ping extended permit ip any any
access-group ping in interface LAN
--
icmp'ye izin vermek icin
conf# show run policy-map
ıf you want to add icmp allow
conf#policy-map global_policy
class inspection_default
inspect icmp
veya
access-list ICMP extended permit icmp any any
access-group ICMP globalaynı leveldeki interface'lere izin vermek icin
same-security-traffic permit inter-interface (permit same security level)
same-security-traffic permit intra-interface
--
https://networkdirection.net/ASA+-+Security+Levels
interface gigabit 0/0
nameif dmz
security-level 50
interface gigabit 0/1
nameif inside
security-level 100
interface gigabit 0/2
nameif outside
security-level 0
! Add allow rule
access-list Inside extended permit ip any any
access-list DMZ extended permit ip any any
access-list Outside extended permit ip any any
! Apply ACLs to interfaces again
access-group Inside in interface inside
access-group Outside in interface outside
access-group DMZ in interface dmz
example;
interface GigabitEthernet0/4
nameif ali
security-level 99
ip address 192.168.3.1 255.255.255.0
!
interface GigabitEthernet0/5
nameif TEST
security-level 100
ip address 192.168.2.1 255.255.255.0
!
access-list ali extended permit ip 192.168.3.0 255.255.255.0 host 192.168.2.100
access-group ali in interface ali
nameif ali
security-level 99
ip address 192.168.3.1 255.255.255.0
!
interface GigabitEthernet0/5
nameif TEST
security-level 100
ip address 192.168.2.1 255.255.255.0
!
access-list ali extended permit ip 192.168.3.0 255.255.255.0 host 192.168.2.100
access-group ali in interface ali
----
LACP
---LACP
interface Port-channel2
lacp max-bundle 8
nameif YKI
security-level 0
ip address 10.50.100.11 255.255.255.0 standby 10.50.100.10
---
ASDM üzerinden bağlanmak için bu ip'in web erişimine açmak
http server enable
ASDM üzerinden bağlanmak için bu ip'in web erişimine açmak
http server enable
http 192.168.100.0 255.255.255.0 management
----
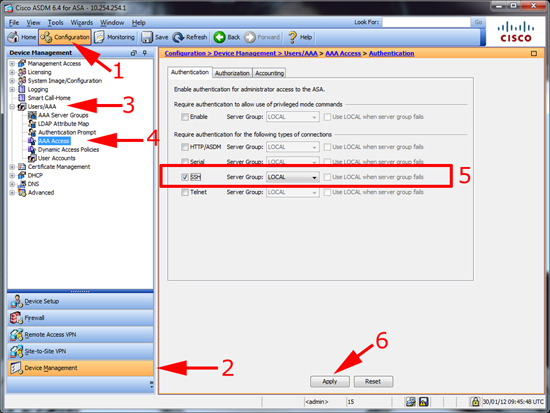
SSH TELNET OPEN
conf t
crypto key generate rsa modulus 1024
write memory
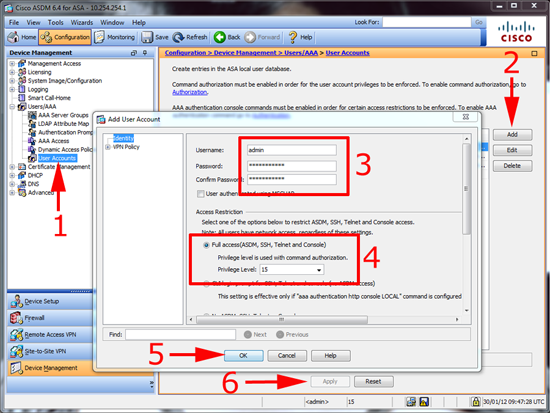
username exampleuser1 password examplepassword1
aaa authentication ssh console LOCAL
ssh 192.168.1.2 255.255.255.255 inside
telnet 192.168.1.2 255.255.255.255 inside
aaa authentication telnet console LOCAL


SSH TELNET OPEN
conf t
crypto key generate rsa modulus 1024
write memory
username exampleuser1 password examplepassword1
aaa authentication ssh console LOCAL
ssh 192.168.1.2 255.255.255.255 inside
telnet 192.168.1.2 255.255.255.255 inside
aaa authentication telnet console LOCAL
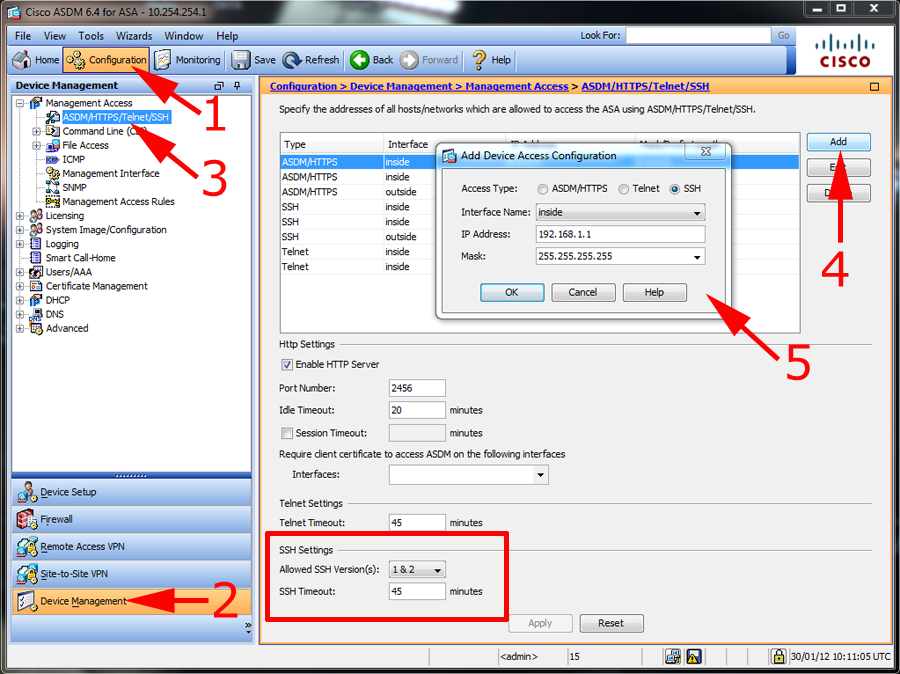
Cisco ASA – Enable AAA for SSH (Local Database) ASDM version 6.4(7)
Cisco ASA – Add a User to the Local Database
snmp-server enable traps syslog
snmp-server host YKI_LAN 10.51.1.56 community public version 2c udp-port 161
logging enable
logging trap notification
logging asdm notification
logging host YKI_LAN 10.51.1.56
---
ntp server 192.168.1.1 source INSIDESUB INTERFACE ON ASA DEVICE

On the left side we have our ASA, it’s Ethernet 0/0 interface will be used for trunking. The switch in the middle is connected to two routers, R1 and R2. Each router represents a host in a different security zone:
- INSIDE1 which uses VLAN 10 and has a security level of 70.
- INSIDE2 which uses VLAN 20 and has a security level of 80.
ASA Configuration
ASA1(config)# interface Ethernet 0/0
ASA1(config-if)# no nameif
ASA1(config-if)# no security-level
ASA1(config-if)# no ip address
ASA1(config-if)# no shutdownASA1(config)# interface Ethernet 0/0.10
ASA1(config-subif)# vlan 10
ASA1(config-subif)# nameif INSIDE1
ASA1(config-subif)# security-level 70
ASA1(config-subif)# ip address 192.168.10.254 255.255.255.0ASA1(config)# interface Ethernet 0/0.20
ASA1(config-subif)# vlan 20
ASA1(config-subif)# nameif INSIDE2
ASA1(config-subif)# security-level 80
ASA1(config-subif)# ip address 192.168.20.254 255.255.255.0Switch Configuration
SW1(config)#interface FastEthernet 0/14
SW1(config-if)#switchport trunk encapsulation dot1q
SW1(config-if)#switchport mode trunk
SW1(config-if)#switchport trunk allowed vlan 10,20
SW1(config-if)#no shutdownSW1(config)#interface FastEthernet 0/1
SW1(config-if)#switchport mode access
SW1(config-if)#switchport access vlan 10
SW1(config-if)#no shutdownSW1(config)#interface FastEthernet 0/2
SW1(config-if)#switchport mode access
SW1(config-if)#switchport access vlan 20
SW1(config-if)#no shutdownRouter Configuration
R1(config)#interface FastEthernet 0/0
R1(config-if)#ip address 192.168.10.1 255.255.255.0
R1(config-if)#no shutdown

R1(config)#ip route 0.0.0.0 0.0.0.0 192.168.10.254R2(config)#interface FastEthernet 0/0
R2(config-if)#ip address 192.168.20.2 255.255.255.0
R2(config-if)#no shutdown
R2(config)#ip route 0.0.0.0 0.0.0.0 192.168.20.254Verification
We’ll start with a quick ping from the routers to their default gateway IP address:R1#ping 192.168.10.254
Type escape sequence to abort.
Sending 5, 100-byte ICMP Echos to 192.168.10.254, timeout is 2 seconds:
!!!!!
Success rate is 100 percent (5/5), round-trip min/avg/max = 1/1/4 ms
Hiç yorum yok:
Yorum Gönder