Network yöneticileri için hataların tespitinde ve güvenlik ihlallerinin incelenmesinde log kayıtları önemlidir. Cisco switch, router gibi cihazlarda çalıştırdığı IOS işletim sistemi ile kullanışlı log mekanizmaları sunmaktadır. Bu log mesajları 5 farklı şekilde oluşturulabilir:
service timestamps log datetime localtime : cihazın üzerindeki show logging time'ların dogru time'da gözükmesi için
- Console logging : Default olarak cihaz tüm log mesajlarını konsol portuna gönderir. Bu yüzden sadece fiziksel olarak bağlantı sağlayan cihazlar log mesajlarına ulaşabilir. Default olarak açık olduğu için bağlı cihaz olup olmadığına bakılmaksızın gönderilir. Bu da işlemciyi yoran bir durumdur.
- Terminal logging: Console logging seçeneğiyle benzerdir, mesajları VTY komut satırına gönderir. Default olarak kapalıdır.
- By default, these syslog messages are only outputted to the console. This is because the logging console command is enabled by default. If you log in through telnet or SSH, you won’t see any syslog messages. You can enable this with the terminal monitor command.
- Buffered logging: Bu seçenekte log mesajları cihazın RAM'ine kaydedilir, ancak cihazlar sınırlı hafızaya sahip olduğu için (genelde 128mb) yeterli olmaz. Yeni kayıtlar eklenmesi sırasında hafıza dolmuş olursa eski kayıtlar silinir.
- Syslog server logging: Logların hafızada tutulması yerine başka bir cihazdaki syslog server'a gönderilmesi sağlanabilir. Hafıza problemi için daha uygun bir çözümdür.
- SNMP trap logging: Loglar SNMP trap kullanılarak SNMP server'a gönderilebilir.
0. Emergency : Sistem kapanıyor
1. Alert : Acil durum mesajları (Sıcaklık sınırı)
2. Critical : Kritik durum mesajları (Mermory allocation hatası)
3. Error : Hata durumu mesajları (Interface up/down)
4. Warning : Uyarı durumu mesajları (SNMP requests)
5. Notification : Normal ancak kayda deger mesajlar (line protocol up/down)
6. Information : Bilgi içerikli mesajlar (Access-list ihlali)
7. Debugging : Debug mesajları
“Logging” komutu log konfigürasyonlarını yapmak için kullanılan basit bir komuttur. Log seviyesini belirlemek için config moda giriş (configure terminal) yapıldıktan sonra :
R1(config)# logging console [level]-----
R1(config)# logging buffered [size]--------
R1(config)# logging host [Syslog Server IP]
R1(config)# logging trap [level]
R1(config)# logging on
logging trap notifications
logging host 10.51.20.29
snmp-server enable traps syslog
snmp-server community public
logging on
optional default 514 (logging host 10.50.2.29 transport udp port 714)
----
Konfigürasyonda yapılan değişiklikleri syslog atmak ve backup config için;
archivepath tftp://172.16.1.10/R1
time-period 1440
 log config
  logging enable
  notify syslog
hidekeysRouter(config)#archive Router(config-archive)#log config
Router(config-archive-log-cfg)#logging enable
First you should use the archive command and then enter the log config section. Use the logging enable command and the router will keep track of the configuration changes. There’s a number of other items that are useful to configure however:
Router(config-archive-log-cfg)#logging size 1000
By default your router will keep 100 entries in the configuration log but we can increase it to 1000 using the logging size command. All the changes will be kept locally on your router but we can send it to the syslog server if we want:
Router(config-archive-log-cfg)#notify syslog
Last but not least, it might be a good idea not to store any passwords in the configuration change logs. You can use the following command to disable this:
Router(config-archive-log-cfg)#hidekeys
Router#show archive log config all
 idx   sess           user@line      Logged command
    1     1        console@console  |  logging enable
    2     1        console@console  |  logging size 1000
    3     1        console@console  |  notify syslog
    4     1        console@console  |  hidekeys
    5     1        console@console  |  interface loopback 0
    6     1        console@console  | shutdown
    7     1        console@console  | no shutdown
SNMP V3
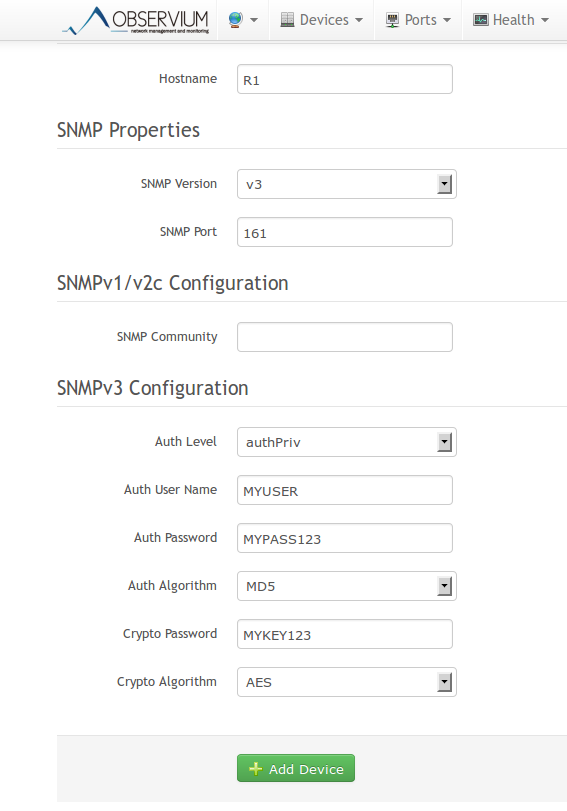
R1:
snmp-server group MYGROUP v3 priv
snmp-server user MYUSER MYGROUP v3 auth md5 MYPASS123 priv aes 128 MYKEY12 ASA
Snmp server'a log göndermek için
snmp-server enable traps syslog
snmp-server host YKI-LAN 10.51.1.56 community public version 2c udp-port 161
logging history notifications
logging enable
logging asdm notification (asdm'de log gormek icin)
syslog icin
logging enable
syslog icin
logging enable
logging host YKI-LAN 10.51.1.56 (server ipsi)
logging trap
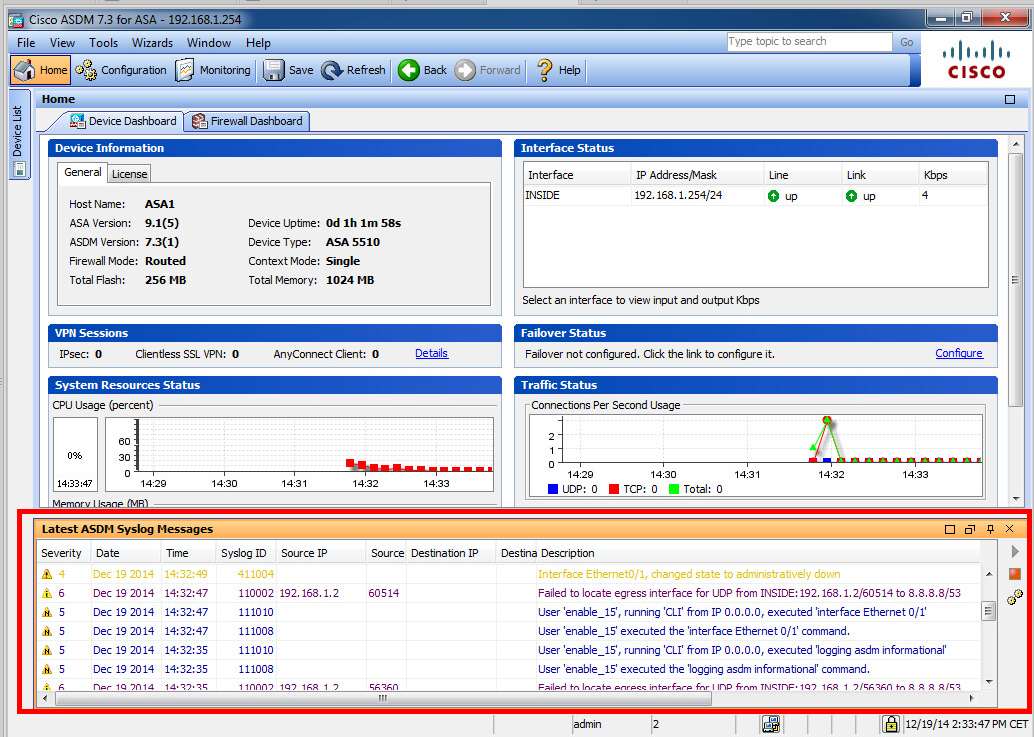
Above you can see the syslog messages in ASDM.
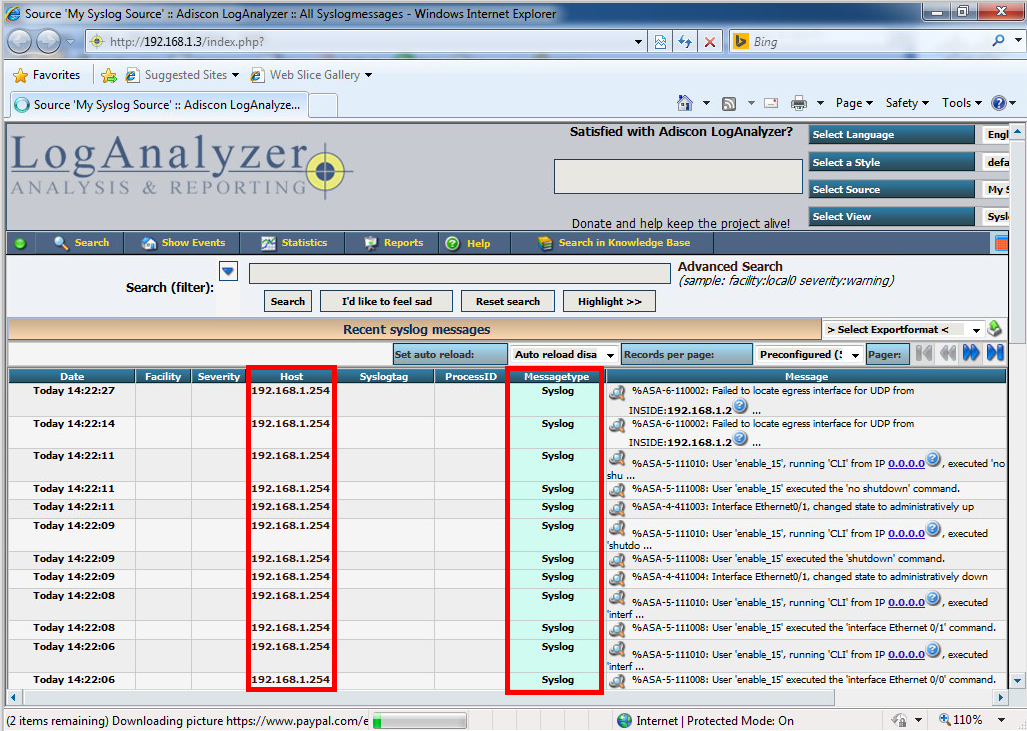
Above you see some incoming messages on my syslog server.
SYSLOG
Graylog En profesyonel çözüm ancak diğer 2 serveri denemedim ama denenebilir sizeları cok az olması nedeniyle.
https://www.graylog.org/
https://syslogwatcher.com/downloads/ windows üzerinde calısıyor.
https://www.winsyslog.com/download/
logging trap
warnings----- ASA1(config)# logging enableLogging to SSH or Telnet
We’ll start by looking at logging on SSH or telnet sessions. Let’s see what level of logging options we have:ASA1(config)# logging monitor ?
configure mode commands/options:
<0-7> Enter syslog level (0 - 7)
WORD Specify the name of logging list
alerts Immediate action needed (severity=1)
critical Critical conditions (severity=2)
debugging Debugging messages (severity=7)
emergencies System is unusable (severity=0)
errors Error conditions (severity=3)
informational Informational messages (severity=6)
notifications Normal but significant conditions (severity=5)
warnings Warning conditions (severity=4)ASA1(config)# logging monitor debuggingASA1(config)# terminal monitorLogging to Internal Buffer
The ASA has an internal buffer that we can use for syslog messages. By default it’s enabled so let’s enable it:ASA1(config)# logging buffered warningsASA1(config)# logging buffer-size 8192ASA1(config)# interface E0/0
ASA1(config-if)# shutdown
ASA1(config-if)# no shutdownASA1# show logging
Syslog logging: enabled
Facility: 20
Timestamp logging: disabled
Standby logging: disabled
Debug-trace logging: disabled
Console logging: disabled
Monitor logging: level debugging, 32 messages logged
Buffer logging: level warnings, 3 messages logged
Trap logging: disabled
Permit-hostdown logging: disabled
History logging: disabled
Device ID: disabled
Mail logging: disabled
ASDM logging: disabled
%ASA-4-411003: Interface Ethernet0/1, changed state to administratively down
%ASA-4-411001: Line protocol on Interface Ethernet0/1, changed state to upLogging to console
We can log syslog messages to the console like this:ASA1(config)# logging console warningsLogging to e-mail
We can also send syslog messages directly to e-mail, here’s an example:ASA1(config)# logging mail alerts
ASA1(config)# logging from-address asa@networklessons.com
ASA1(config)# logging recipient-address info@networklessons.com
ASA1(config)# smtp-server 192.168.1.1Logging to ASDM
We can also log to ASDM where you can see the syslog messages in the dashboard. Here’s how to enable it:ASA1(config)# logging asdm debuggingAbove you can see the syslog messages in ASDM.
Logging to Syslog Server
A good choice is to send syslog messages to a syslog server. Here’s how to do it:ASA1(config)# logging host INSIDE 192.168.1.3
ASA1(config)# logging trap alertsAbove you see some incoming messages on my syslog server.
Logging to SNMP server
Last but not least, we can send syslog messages as SNMP traps to a SNMP server. Here’s how:ASA1(config)# snmp-server host INSIDE 192.168.1.1 trap community MY_COMMUNITY
ASA1(config)# snmp-server enable traps syslog
ASA1(config)# logging history notificationsSYSLOG
Graylog En profesyonel çözüm ancak diğer 2 serveri denemedim ama denenebilir sizeları cok az olması nedeniyle.
https://www.graylog.org/
https://syslogwatcher.com/downloads/ windows üzerinde calısıyor.
https://www.winsyslog.com/download/
Hiç yorum yok:
Yorum Gönder