On Cisco IOS, you can configure precisely how you want to use the AAA server for authentication. You can use it for console or VTY access but also for enable (privileged) mode and some other options like PPP authentication.
In this lesson, I will show you how to configure AAA authentication on a Cisco IOS router. We will use a RADIUS server with the FreeRADIUS software. FreeRADIUS is (as the name implies) free and easy to configure. Once everything is configured, a user that wants to access the console and use privileged mode will be authenticated by the RADIUS server.
Configuration
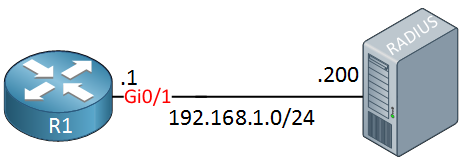
Here is the topology that I will use:
We have a router and the RADIUS server. Let’s start with the configuration of FreeRADIUS .
FreeRADIUS
FreeRADIUS runs on Linux and most Linux distributions have it in their repositories. I’m using a Ubuntu server and you can use apt-get to install it:# apt-get install freeradius freeradius-utils# vim /etc/freeradius/clients.confclient 192.168.1.1 {
secret = MY_KEY
nastype = cisco
shortname = router
}Let’s add a user account, this will be used by the admin that wants access to the router. Open the users file:
# vim /etc/freeradius/usersREMOTE_ADMIN Cleartext-Password := "MY_PASSWORD"
Service-Type = NAS-Prompt-User $enab15$ Cleartext-Password := "REMOTE_ENABLE"
Service-Type = NAS-Prompt-UserNow we have to (re)start FreeRADIUS to apply these changes:
# /etc/init.d/freeradius restart
freeradius stop/waiting
freeradius start/running, process 18145 # /etc/init.d/freeradius stop
freeradius stop/waiting # freeradius -XListening on authentication address * port 1812
Listening on accounting address * port 1813
Listening on authentication address 127.0.0.1 port 18120 as server inner-tunnel
Listening on proxy address * port 1814
Ready to process requests. Cisco IOS
Our router is configured by default to use no or local authentication. That’s something we have to change. First you need to enable the AAA commands:R1(config)#aaa new-model R1(config)#radius server MY_RADIUS
R1(config-radius-server)#address ipv4 192.168.1.200 auth-port 1812 acct-port 1813
R1(config-radius-server)#key MY_KEY
Older versions of Cisco IOS use the radius-server command to add new RADIUS servers.
Now we can configure the router to use our RADIUS server for authentication. Let’s check the aaa authentication command:R1(config)#aaa authentication ?
arap Set authentication lists for arap.
attempts Set the maximum number of authentication attempts
banner Message to use when starting login/authentication.
dot1x Set authentication lists for IEEE 802.1x.
enable Set authentication list for enable.
eou Set authentication lists for EAPoUDP
fail-message Message to use for failed login/authentication.
login Set authentication lists for logins.
password-prompt Text to use when prompting for a password
ppp Set authentication lists for ppp.
sgbp Set authentication lists for sgbp.
suppress Do not send access request for a specific type of user.
username-prompt Text to use when prompting for a username Let’s look at the login options:
R1(config)#aaa authentication login ?
  WORD     Named authentication list (max 31 characters, longer will be
           rejected).
default The default authentication list. I will use the default authentication list so that AAA authentication is used for the console and AUX port. I’ll show you how I can exclude the VTY lines.
Let’s look at the options of the default list:
R1(config)#aaa authentication login default ?
  cache          Use Cached-group
  enable         Use enable password for authentication.
  group          Use Server-group
  krb5           Use Kerberos 5 authentication.
  krb5-telnet    Allow logins only if already authenticated via Kerberos V
                 Telnet.
  line           Use line password for authentication.
  local          Use local username authentication.
  local-case     Use case-sensitive local username authentication.
  none           NO authentication.
passwd-expiry enable the login list to provide password aging support R1(config)#aaa authentication login default group ?
WORD Server-group name
ldap Use list of all LDAP hosts.
radius Use list of all Radius hosts.
tacacs+ Use list of all Tacacs+ hosts. R1(config)#aaa authentication login default group radius ?
cache Use Cached-group
enable Use enable password for authentication.
group Use Server-group
krb5 Use Kerberos 5 authentication.
line Use line password for authentication.
local Use local username authentication.
local-case Use case-sensitive local username authentication.
none NO authentication.
<cr> R1(config)#aaa authentication login default group radius localR1(config)#username LOCAL_ADMIN password MY_PASSWORDR1(config)#aaa authentication login VTY localR1(config)#line vty 0 4
R1(config-line)#login authentication VTY Let’s also configure the router to use the RADIUS server when we want to enter enable (privileged) mode:
R1(config)#aaa authentication enable default group radius enable R1(config)#enable password LOCAL_ENABLEVerification
Everything is in place, let’s see if it works. On Cisco IOS, you can use the test command to check if AAA authentication is working. For example, here’s how to check if username “REMOTE_ADMIN” and password “MY_PASSWORD” works:R1#test aaa group radius REMOTE_ADMIN MY_PASSWORD new-code
User successfully authenticated R1#exit
R1 con0 is now available

Press RETURN to get started.

User Access Verification

Username: REMOTE_ADMIN
Password:

R1>R1>enable
Password:
R1#R1:
hostname R1
!
enable password LOCAL_ENABLE
!
aaa new-model
!
aaa authentication login default group radius local
aaa authentication login VTY local
aaa authentication enable default group radius
!
aaa session-id common
!
ip cef
!
username LOCAL_ADMIN password 0 MY_PASSWORD
!
interface GigabitEthernet0/1
 ip address 192.168.1.1 255.255.255.0
!
radius server MY_RADIUS
 address ipv4 192.168.1.200 auth-port 1812 acct-port 1813
 key MY_KEY
!
end
Hiç yorum yok:
Yorum Gönder